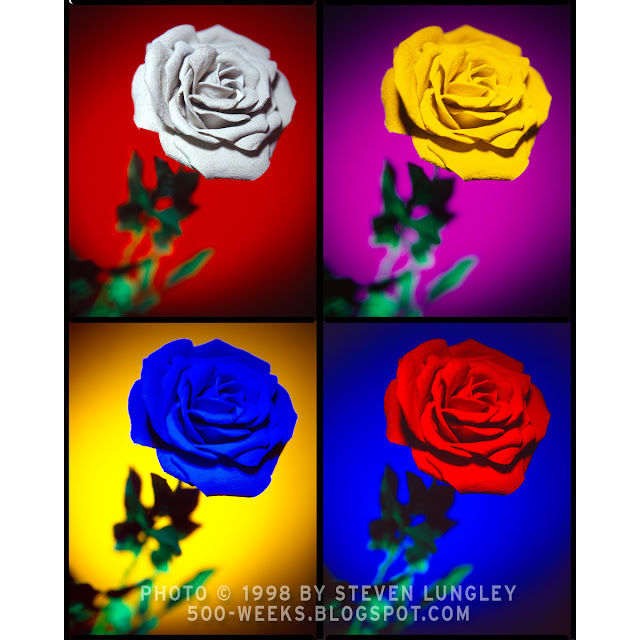
Rose of many colours: E6 vs. C41
500 weeks #039
January in Canada is cold, which I can deal with, but worse, it’s boring, which is something I do not deal well with.
As an editorial photographer, I learned that the year moves in cycles, some busier than others. November and December can be some of the busiest weeks of the year. Every band, film maker and author seems to have a project to release and promote in hopes of making sales in time for Christmas. There are also loads of parties and events to attend and maybe photograph. Then January hits and….. nothing, not even crickets, because, as mentioned before, it’s too cold.
To fill the time, I learned to plan for it, by setting up a personal project to pursue. This particular January found me holding a rose, not grown, but hand-made, of leather and wire by my friend Maria Kypros. The sample she provided had a white blossom with a dark green stem and her request was for me to photograph it for her promotional material. With time on my hand, my mind was calculating how to make the promo photography more… challenging.
So I tried to bundle a few influences all together into a technical exercise with aesthetic goals. First challenge, which type of film is better? Negative or positive?
 |
| The same set ups as the first images, except a different type of film. These frames were all captured on Fujifilm Reala colour negative film. Same exposure as above, but different colour renditions. |
I used colour negative film whenever I needed to deliver prints as the final result. Alternatively, I used slide film – also known as transparency or chrome film, which creates a colour positive - for client jobs that were going for high resolution scans.
Around this time, I had met Alan Grogan, who was a custom photographic printer specializing in Cibachrome (also known as Ilfochrome Classic) which is used to make positive prints directly from slide film. He showed me samples - high gloss, high resolution, and highly saturated colours - that really caught my eye. He also talked up the greater dynamic range that transparency film had over negative film.
So I decided to shoot the rose on both negative and positive film, and to make a set of prints from both to judge the differences with my own eyes. This would also be the second technical challenge: What was the better print material? Standard RA4 paper for prints from negatives, or Cibachrome, to make prints from transparencies?
The final challenge was lighting. Because Maria’s flower had a minimum of colours in it, I decided to stage it in front of a black background and to light the blossom and the background to different colours by using theatrical gels on my lights. The black background and white subject would allow me to chart and record how to meter and expose in order to get the different surfaces to change colour when photographed.
In an all-analog workflow, photographers tested out their lighting with Polaroid instant film. Many camera manufacturers sold “Polaroid backs”, accessories that fit on the back of their cameras that accepted Polaroid instant film. A Polaroid back allowed the photographer to generate a small, low resolution, sample photo that could be taken, developed and seen a minute later. It was a way of checking the lighting ratios and exposure setting before using the real film.
 |
| This the same purple background gel in both. Totally different. |
It was also expensive, on a per photo basis. However, one of the events that took place in my very busy December was “Santa’s Jolly Christmas”, a fundraising charity musical show and auction at The Rivoli in downtown Toronto. Organized by drummer Graeme Kirkland, the evening featured a mesmerizing number of musicians entertaining the crowd, a charity auction featuring politician Jack Layton as the auctioneer and the opportunity for every guest in attendance to have their photo taken with Santa and his beautiful angels by his personal photo elf: me.
I volunteered my time and dressed up as an elf for ten years straight for the event. It was always a great show for a great cause.
The instant film this particular year had been donated by Fujifilm Canada, who supplied the organizer with enough packs to allow me to take two images of every member of the public who paid for a ticket. But not all adults want to have their photo taken with Santa, and many who did, wanted their date with them in the in the photo.
End result: We ended the night with many packs of unused film, which I was allowed to take home, and I decided to use it on my personal project: the rose.
Sometimes Santa is good to you.
So I constructed my little set, and started work on the images. For most colours, to make the white blossom a different colour, I had to meter and expose normally. If the coloured light metered at f/5.6, then the exposure worked on the test image with the lens set at f/5.6.
For the black background, the dark paper absorbed most of the light, so I had to supply far more strobe power than my light meter called for. If I increased the amount of light hitting the cloth until it metered at f/16 - three full f/stops over-exposed, an increase of 400% from the set exposure – the black paper would exhibit a beautiful colourful glow in the middle, fading off towards the edges. A bit less light for the light yellow, a bit more for the deeper shade of blue.
Except for the colour red, when used on the white blossom. Then things got really tricky.
 |
With the aperture on my camera set to f/5.6, I added the red gel to my main flash and checked my meter. Gels absorb light, so I had to increase the power until I got a reading of f/5.6. Once done, I took a test image on the instant film, and the resulting photos was ….wrong. Red blossom with reddish shadows. Not much detail left and no black in the shadows.
I had always been told that red coloured light was high in chroma and low in luminance, and to overexpose. So I increased the light in the main flash again until my light meter read f/8.0, which was a one stop – or 100% - increase in brightness from the previous exposure and took another test photo.
Still looked wrong, so I increased the flash power another full stop, for a reading of f/11.0. Took another test photo, with the lens still set at f/5.6. That test looked worse than the previous two.
I kept on this road though, and increased the flash power to read f/16.0. With the lens still at f/5.6, the resulting test photo was all red, completely red and totally useless, so I was really scratching my head.
However, one of my problem solving theories is, if going one direction isn’t working, I am going to do a full 180 degree turn and head in the opposite direction. So I turned the power in the main unit flash down until it reads f/4.0, which would be one-stop of underexposure.
That test was the best yet, but still not perfect, so I decreased the main power more, until the flash reads at f/2.8 and took another test photo. The results got better, delivering a rich red and definite black shadows.
I decrease the power again, until it reads at f/2.0, which was three stops of under-exposure and the test photo look almost perfect, but it was definitely underexposed. So I turned the main light back up a bit until the light measured at f/2.2. The resulting test image was exactly what I was looking for.
Counter to all the advice I had ever received before, my tests were showing that to expose for red-light conditions, I did not have to over-expose. In fact, the opposite was correct, and I had to under-expose the red portion of the image by 2 2/3rds stops.
The resulting images are on display in this post and I stand by my tests. If a photographer is working under red, theatrical light, the camera setting that will provide the most vivid red, while still retaining black shadows, the best solution is to under-expose by 2 2/3rd stops.
I took these images on a medium format camera with interchangeable film magazines. One loaded with negative film, and the other with positive. I worked through my multiple colour variations, exposing each combo on both negative and positive film. Once everything was developed, I got started in the darkroom. First, I gave the selected positive transparencies to my pro photo lab, and they made internegs for me. An internegative is a copy of an original transparency on low-speed, fine-grained 4”x5” negative film designed for making duplicates.
Then I gave the original positive transparencies to Alan Grogan (who was aware of what I was doing) and he made 8”x10” Cibachrome print from each of the four selected final images. Then I went into the darkroom, and made two sets of prints, one from the original negatives and another from the internegatives, all on glossy RA4 paper.
When all twelve prints were completed, I scrutinized them, along with Mr. Grogan.
Our observations were: all the prints looked great, but when viewed side-by-side with each other, we could see differences. The Cibachrome enlargements had more vibrant colour and richer black levels than the colour negative originals, particularly in the reds and deeper colours. The deep blues, and purples and reds all had a bit of yellow in them when captured on the negative originals.
 |
| The lighting set-up for these series of images. |
According to Mr. Grogan, the orange base material on C41 negative film and the blue cast on corresponding RA4 paper is designed to cut off the deeper tones by design. At a certain point in the colour spectrum, the deeper tones cross over into each other, and this causes cross curves, which is when one colour starts influencing the look of another. This causes film manufacturers troubles, because it looks like an error. Rather than create more accurate film, those difficult tones are just filtered out.
That is why a true fire engine red cannot by captured on negative film. It will always have a touch of yellow in it.
The prints from the internegatives were closer to the original transparencies than the camera negative originals, which was not something I expected. I thought the interneg film would influence the colours to look more like the camera negatives.
I was impressed enough by the Cibachrome prints that I actually started photographing personal images on transparency film rather than negative. I also rented darkroom time and taught myself how to print Cibachromes. Enough so that years later, as the editorial photography market collapsed, I ended up working for Mr. Grogan as his printer.
Technical stuff:
Camera: All images taken on a Bronica ETRsi wth 75mm f/2.8 Zenzanon-PE lens using Fujifilm RDP II Provia 100 colour transparency and Reala 100 ISO colour negative film.
Lighting: Dynalite and Elinchrom strobes with Rosco theatrical gels providing the colours.
Light levels measured using a Sekonic L-328 Digilite F light meter. All measurements were done using incident metering. My method is to place the white diffusion dome at the same plane as the subject and to aim the dome directly at the light I wanted to measure. I would then use my free hand to block any stray light from the other lights on set.


Comments
Post a Comment